In this article, we are trying to draw a basic map to programmatically manipulate xlsx files using Office Xml library. Many applications require working with excel files, either for reading and importing data from it, or for exporting data into reports, so it is important to know how to programmatically manipulate excel files.
Since 2007, Excel files have completely changed their internal structure. Xls was a proprietary binary file format, whereas xlsx is an Xml Based-format, called Office Open Xml (OOXML).

An xlsx file is a zip package containing an xml file for each major part of an Excel file (sheets, styles, charts, pivot tables). If you want to check the contents of an xlsx, all you have to do is to change the extension of the file from xlsx to zip and then unarchive it.
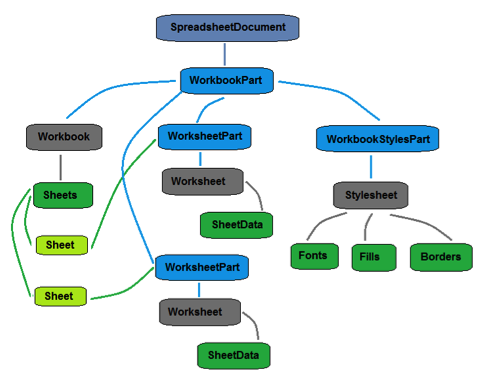
A spreadsheet document contains a central WorkbookPart and separate parts for each worksheet. To create a valid document, you must put together 5 elements, Workbook, WorksheetPart, Worksheet, Sheet, SheetData.
The primary task of a WorkbookPart is to keep track of the worksheets, global settings and the shared components of the Workbook. The document needs to contain at least one Worksheet that is defined inside a WorksheetPart. A worksheet has three main sections:

All the classes needed to manipulate an xlsx file can be found in Open Xml SDK. Here is a simple example of applying a sum on a data column.
using (SpreadsheetDocument document =
  SpreadsheetDocument.Create(path,
  SpreadsheetDocumentType.Workbook))
{
    var workbookPart = document.
      AddNewPart();

 workbookPart.Workbook = new Workbook();
 var worksheetPart = document.
   AddNewPart();

 // create sheet data
 var sheetData = worksheetPart.Worksheet.
   AppendChild(new SheetData());

 // create a row and add a data to it
  sheetData.AppendChild(new Row(new Cell() {
    CellValue = new CellValue("5"),
    DataType = CellValues.Number }));

  sheetData.AppendChild(new Row(new Cell() {
   CellValue = new CellValue("3"),
   DataType = CellValues.Number }));

  sheetData.AppendChild(new Row(new Cell() {
   CellValue =  new CellValue("65"),
   DataType = CellValues.Number }));

  sheetData.AppendChild(new Row(new Cell() {
   CellFormula = new CellFormula("=SUM(A1:A3)"),
   DataType = CellValues.Number }));

   // save the worksheet
   worksheetPart.Worksheet.Save();

   // create the sheet properties
   var sheetsCount = document.WorkbookPart.Workbook.
     Sheets.Count() + 100;

   document.WorkbookPart.Workbook.Sheets.
     AppendChild(new Sheet()
 {

 Id = document.WorkbookPart.
   GetIdOfPart(worksheetPart),

 SheetId = (uint)document.WorkbookPart.Workbook.
   Sheets.Count() + 1,
   Name = "MyFirstSheet"
 });
 // save the workbook
 document.WorkbookPart.Workbook.Save();
} A pivot table is a table used for data summarization, that can automatically sort, count or apply average on the data stored in a data table.
A pivot table needs a source data table. We will assume that we already have the data table, in a sheet called "DataSheet".
A pivot table has 4 main parts: WorksheetPart, PivotTablePart, PivotTableCacheDefinitionPart and PivotCacheRecordsPart. Also, we need to instantiate a list of PivotCaches, with one PivotCache child. In the following images, you can see the "map" of a pivot table.
Figure 4 - Components needed for creating a Pivot Table
var pivotWorksheetPart = document.WorkbookPart.
  AddNewPart();

pivotWorksheetPart.Worksheet = new Worksheet();
var pivotTablePart = pivotWorksheetPart.
  AddNewPart();
var pivotTableCacheDefinitionPart = pivotTablePart.
  AddNewPart();

document.WorkbookPart.AddPart(
  pivotTableCacheDefinitionPart);

var pivotTableCacheRecordsPart =
  pivotTableCacheDefinitionPart.
  AddNewPart();

var pivotCaches = new PivotCaches();
pivotCaches.AppendChild(new PivotCache()
  {
    CacheId = pivotCacheId,
    Id = document.WorkbookPart.
      GetIdOfPart(pivotTableCacheDefinitionPart)
  });

document.WorkbookPart.Workbook.AppendChild(pivotCaches); 
The PivotTablePart describes the layout. Its child, the PivotTableDefinition stores the location of the table and the PivotFields. There are two kinds of PivotFields: RowFields and DataFields.
The pivot table definition needs also to know the id of the PivotCache we defined above.
In the pivot table definition you can also specify the format in which you want to display the table. These can be: Compact (set compact flag to true), Outline (set the Outline flag to true), or the Tabular format (set the GridDropZones flag to true).
The PivotTableCacheDefinitionPart with its child PivotCacheDefinition, defines the cache fields. We need to declare a cache field for each column in the table. It also contains the cache source type (as SourceValues.Worksheet) and the worksheet source.
The PivotCacheRecordsPart needs only to be defined and appended, this part being automatically populated with the cached values of the table.
Now, let"s see how to apply some conditional formatting on the data, that is to format and highlight some cells based on their values.
In order to do that, you need to define two things.
First, you need to define the styles that you want to apply to the highlighted cells, mainly the fonts and colors. The styles are declared in the Stylesheet of the workbook part.
Next, you need to define the rules with the help of the ConditionalFormatting object that has as a child a ConditionalFormattingRule object. Below you can see an example, where we apply a conditional formatting for the cells having a value less than 3.
var pivotWorksheetPart =
  document.WorkbookPart.AddNewPart();

pivotWorksheetPart.Worksheet = new Worksheet();
var pivotTablePart = pivotWorksheetPart.AddNewPart();
var pivotTableCacheDefinitionPart =
  pivotTablePart.
  AddNewPart();

document.WorkbookPart.
  AddPart(pivotTableCacheDefinitionPart);

var pivotTableCacheRecordsPart =
  pivotTableCacheDefinitionPart.
  AddNewPart();

var pivotCaches = new PivotCaches();
pivotCaches.AppendChild(new PivotCache()
  {
    CacheId = pivotCacheId,
    Id = document.WorkbookPart.
      GetIdOfPart(pivotTableCacheDefinitionPart)
  });

document.WorkbookPart.Workbook.AppendChild(pivotCaches); In this article we draw a basic "map" of how to navigate through OpenXML in generating xlsx files. Even when trying to present it as easy as possible, you can see that the code for even the most simple operations can and will get complex.